HOW TO MAKE AN EASY, NO-SEW, DOLL-BABY
Below you will learn how to make a easy no-sew doll baby in under 15
minutes. This procedure will surely be recognized as an updated version
of the New Orleans Style Voodoo Doll so I'll admit that before someone else points this out. To begin you will need:
In addition to the above listed items, you will also need some personal concerns of the person your doll is to represent to be incorporated into the doll as well as any herbs that correspond to your goal. For example, if your doll was to be used in a love spell, you would want love herbs; money drawing herbs for a money doll; etc..
- Copy/Construction Paper
- Scissors
- Strip of Cloth
- String
In addition to the above listed items, you will also need some personal concerns of the person your doll is to represent to be incorporated into the doll as well as any herbs that correspond to your goal. For example, if your doll was to be used in a love spell, you would want love herbs; money drawing herbs for a money doll; etc..
Step One
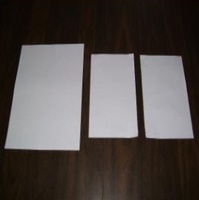
Begin with your two sheets of paper. In the example above, I am using two sheets of standard 8.5 X 11 " copy paper. Set one sheet of paper aside for now and fold the other sheet of copy paper in half lengthwise and tear it in half.
Step Two
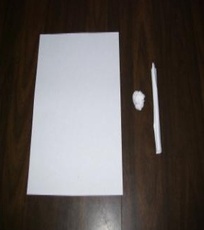
Place your personal concerns in the center of one of the halved pieces of paper and then ball up the piece of paper. This ball will serve as the 'head' of your doll. The other half of the paper will be rolled up in a tight tube to make the arms for your baby doll. If you wish you can incorporate your herbs, a written petition, etc.. into the charm as well.
Step Three
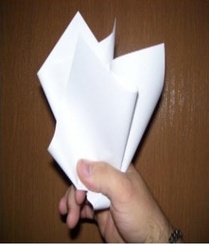
Place the balled up piece of paper in the center of the second whole sheet of copy paper. Hold the ball in the center of the whole sheet of paper and fold around the piece of paper to form the body of your doll baby.
Step Four
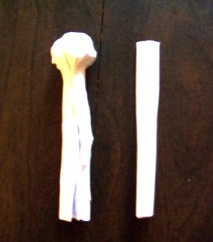
Due to the shape of the paper, the bottom portion (or feet) of your doll will be uneven. Using your scissors, even off this portion of your doll. Next, measure the tube you made for the doll's arms against the length of the doll's body and cut it (if necessary) so that they are equal length.
Step Five
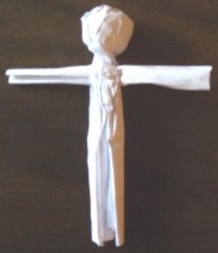
Using the sharp point of your scissors, cut a small hole through the doll baby's body just under the head. Then insert the tube through the hole to form the arms of your doll baby. To make this step easier, I have learned to drill the hole through the doll from both sides and then slide a thick BIC pen through the hole to make it a bit larger and circular. You now have your basic doll.
Step Six
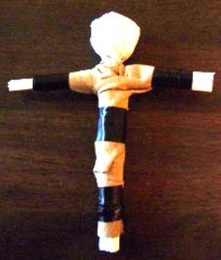
Now using a long strip of cloth roughly one inch by 15 inches long, wrap up the doll as pictured. If you wish to incorporate herbs into your doll they will be secured between the doll and this strip of cloth. In the beginning this may be difficult if you are using fine powders and such, however you will get the hang of it. There have been times that I put a small layer of glue on the side of the cloth that will touch the doll and sprinkled my herbs in their dried form on the glue.
I usually begin wrapping the cloth at the left arm, wrapping the cloth across the chest, right arm, and then down the body. Finally, secure the feet, waist, and wrists with string. For the purpose of this tutorial I used black tape.
Step Seven
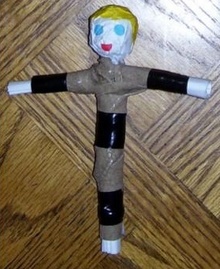
Finally, personalize your doll by giving it facial features and hair. I accomplish this by using a hole puncher to punch out small circles from colored construction paper and gluing them to the doll. If known to me I match the color of the doll's eyes and hair to the person it is intended to represent. I don't normally give the doll a nose. Others may wish to use the googly eyes that can be found at craft and dollar type stores.
The hair depends on the person's hairstyle and I normally try to get this as close to the actual person as well. For long hair, I use one big piece of paper which I glue to the doll and then cut and pinch the hair into shape. For shorter hair, such as in our example here, I tear several small pieces of paper and glue them to to doll. I begin at the front of the head forming the hair line. I then pinch the paper into the general shape of the hair and then work backwards to the nape of the neck.
Your doll is then completed. As you can see this is a very simple process which gets easier each time you make a doll.